elemental-lowcode
Elemental lowcode development platform.
Todo list
This tutorial will take you through the construction of a todo list app where users can login/register for an account, and can then manage a number of todo lists.
Getting logged in
If you do not already have the Elemental container running on your system, ensure that you do with the following commands:
$> sudo docker pull philipskinner/elemental:master
$> sudo docker run -d -p 80:80 --name elemental philipskinner/elemental:master
Once the container is up and running you can connect to it by accessing the Elemental Administrative interface on http://admin.elementalsystem.org.
The default login details are:
- Username: admin
- Password: admin
Once you are logged in and able to see the dashboard we can continue with creating the todo list application.
Create our website
The users of our todo list application are going to access it via a website.
These websites are hosted on http://interface.elementalsystem.org (which should resolve to your localhost).
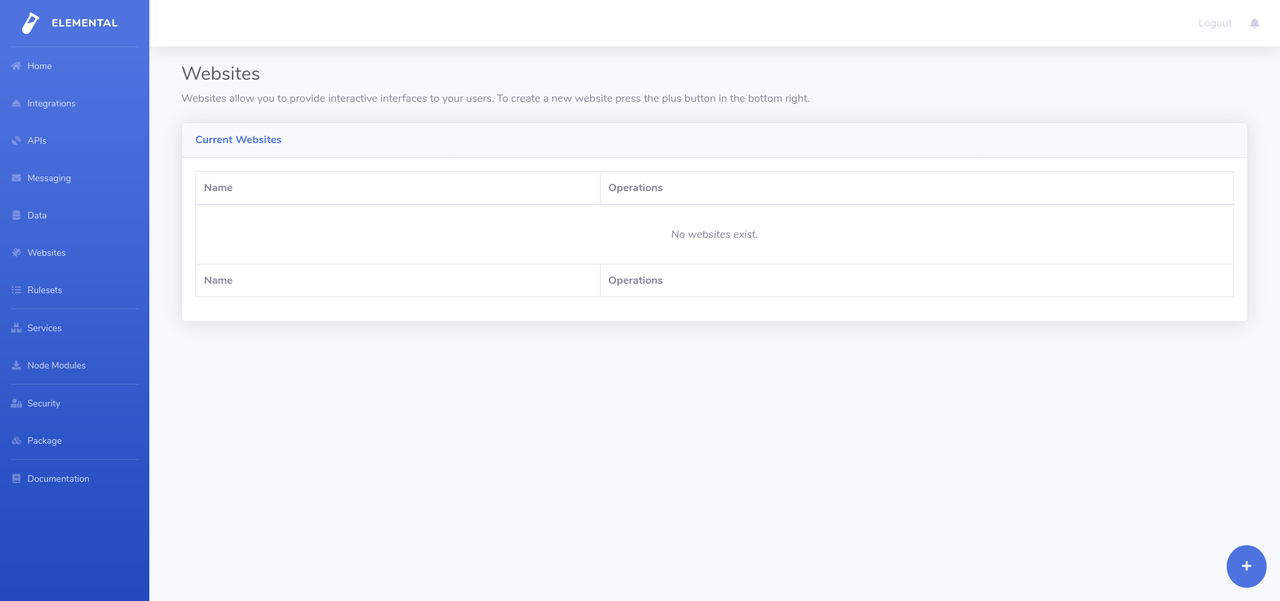
To create a website navigate to the Websites section of the administrative interface and click the large blue plus in the lower right corner:
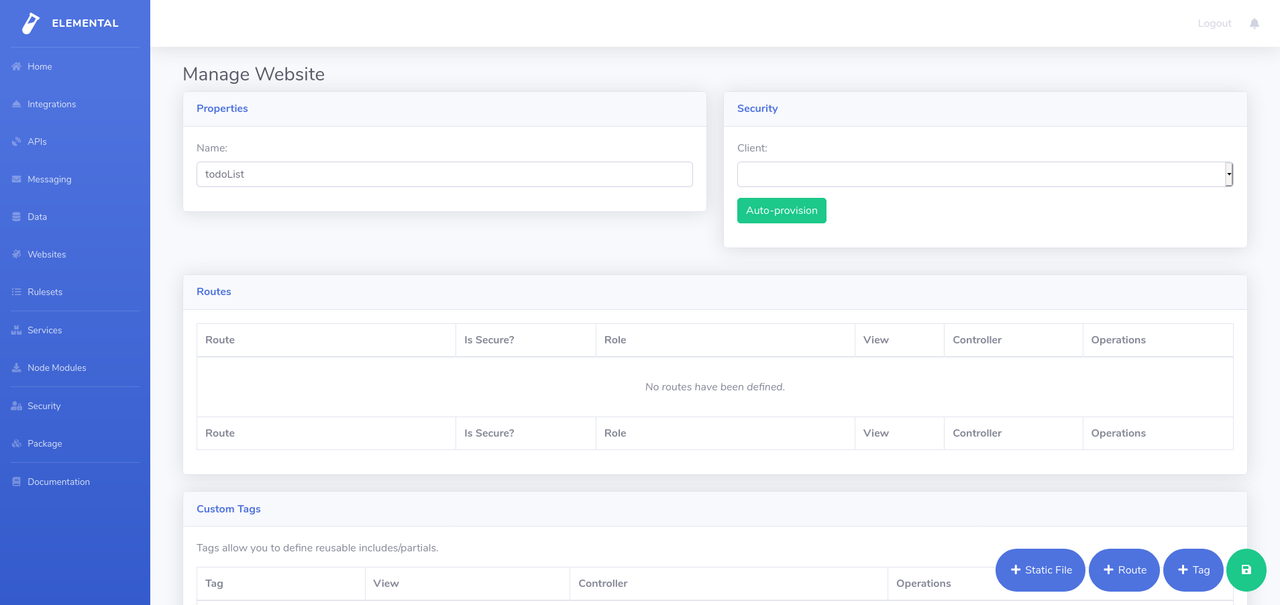
You must provide a name for the website so go ahead and call it todoList.
We’ll want to authenticate our users so they can all have their own todo lists, to do this we can auto-provision an oauth client for the website by pressing the “Auto-provision” button under security.
We’ll also have to add a base route into the website so we can serve our application from it, click the + Route button to add a route, then update the routes path to be a single /. Check the security enabled flag on the endpoint aswell, this will automatically enable the requirement that users must be logged in before accessing the route.
Save your website then attempt to access it via http://interface.elementalsystem.org/todoList/. You will be prompted to login to the website before you can see it. Once you have done this nothing will render yet as we need to define our interfaces before we see anything.
Website header/footer
Elemental interfaces allow you to define custom tags that can be re-used within other custom tags and within your view definitions.
We’re going to construct three custom tags within the todoList website:
- A header
- A footer
- A wrapper
Step 1
Click the + Tag button three times within the todoList website. Rename all three of the new tags so that they are called pageHeader, pageFooter, and wrapper.
We’ll start by defining our wrapper tag. This tag is going to include both the header and the footer, wrapping the content of a view from a route. Click on the modify view button next to the wrapper tag, and once the editor has opened select Source mode in the top bar - this will open the source configuration for the wrapper tag.
Enter the following into the editor:
{
    "tag" : "html",
    "children" : [
        {
            "tag" : "head",
            "children" : []
        },
        {
            "tag" : "body",
            "children" : [
                {
                    "tag" : "pageHeader"
                },
                {
                    "tag" : "main",
                    "class" : "main",
                    "children" : "$.children"
                },
                {
                    "tag" : "pageFooter"
                }
            ]
        }
    ]
}
This view definition includes a html element that has two children, the head and the body. Within the head we have no children defined yet, but within the body we have three children, the pageHeader, the pageFooter and a div that will wrap any children we pass into the wrapper tag when it is referenced within a view.
To see this in action, lets modify our the view for our / route so that we utilise the wrapper tag. Click on the modify view button next to the / route, swap into source mode and then enter the following into the editor:
{
    "tag" : "wrapper",
    "children" : [
        {
            "tag" : "strong",
            "text" : "Hello world!"
        }
    ]
}
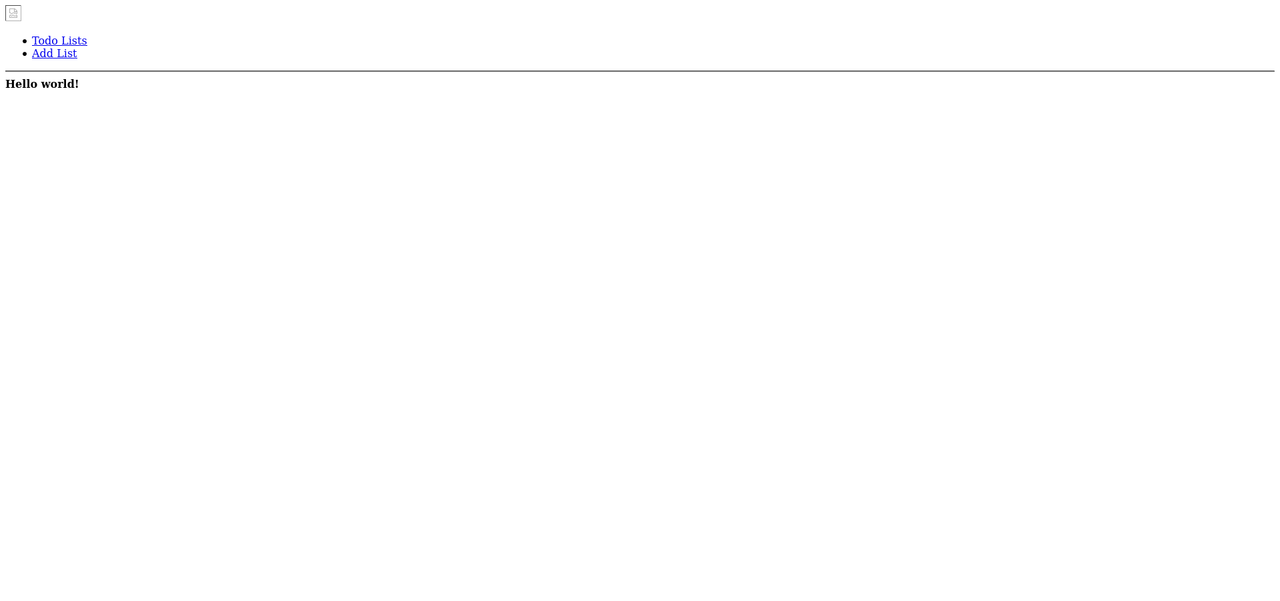
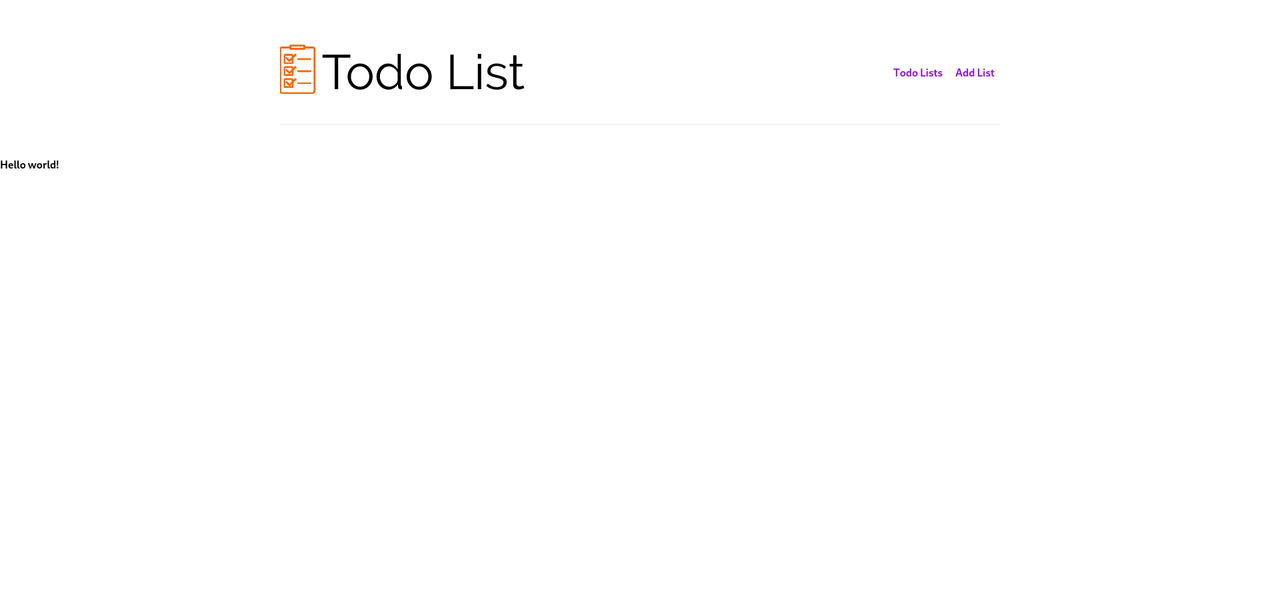
If you reload your website on http://interface.elementalsystem.org/todoList you’ll now see a bold Hello World!. If you view the source for the page you’ll see the markup reflects the configuration we have entered so far - but the header and footer are coming through as a single empty div each as we have not defined their views properly.
Step 2
To create the pageHeader tag we’ll want to include a logo and a simple menu that lets people view their todo lists and to create a new todo list. Modify the pageHeader tags view and enter the following configuration:
{
    "tag": "header",
    "children": [
        {
            "tag": "nav",
            "children": [
                {
                    "tag": "span",
                    "onclick" : {
                        "eventName" : "hideForm"
                    },
                    "children": [
                        {
                            "tag": "img",
                            "src": "/todoList/static/logo.png"
                        }
                    ]
                },
                {
                    "tag": "ul",
                    "children": [
                        {
                            "tag": "li",
                            "children": [
                                {
                                    "tag": "span",
                                    "onclick" : {
                                        "eventName" : "hideForm"
                                    },
                                    "text": "Todo Lists"
                                }
                            ]
                        },
                        {
                            "tag": "li",
                            "children": [
                                {
                                    "tag": "span",
                                    "text": "Add List",
                                    "onclick": {
                                        "eventName": "showForm"
                                    }
                                }
                            ]
                        }
                    ]
                }
            ]
        },
        {
            "tag": "hr"
        }
    ]
}
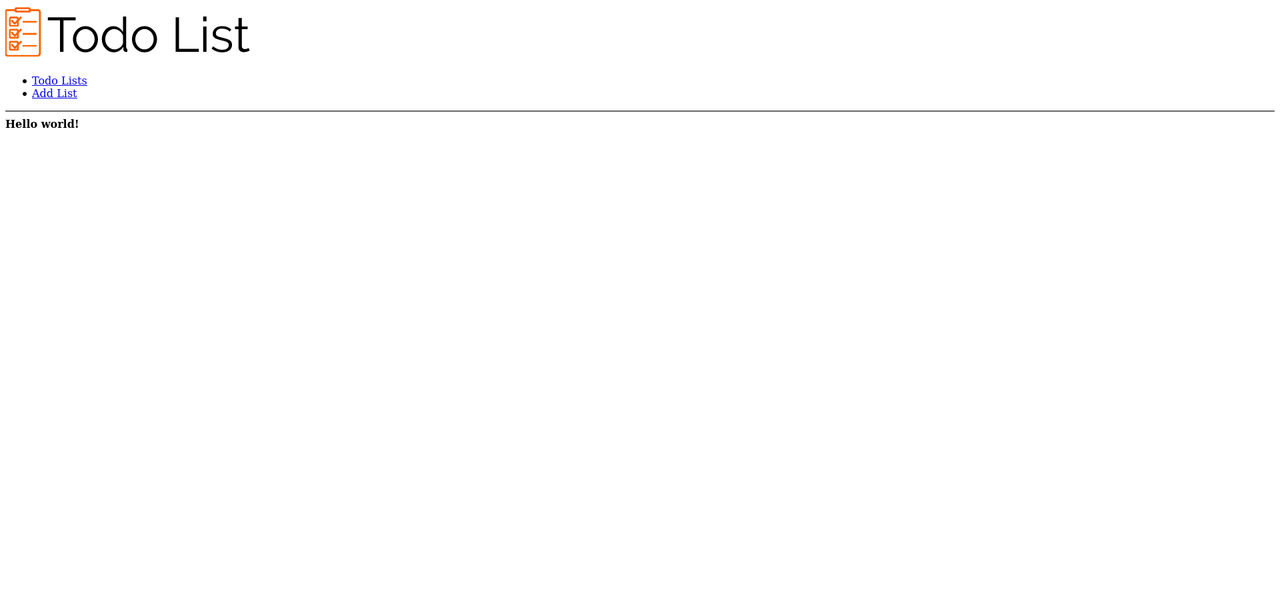
Once you save this and reload your todoList website you’ll see that it is outputting the new markup:
This doesn’t look so great, nor does it load the missing image that we are referencing within the interface markup - we can correct that by uploading some static resources. You can download the static resources from the following urls:
https://github.com/PhilipSkinner/elemental-examples/tree/master/todo/website/todo-static
Once you have downloaded the static resources, upload them to the todoList website by pressing the + Static File button on the main website admin screen. Once uploaded reload your interface and it should render the logo:
The page still isn’t looking so great, and we have already uploaded a css file (mvp.css), lets go ahead and update our wrapper to include a new child tag within the head. Add the following config to the wrapper tag within the empty children collection on the head tag:
{
    "tag" : "link",
    "href" : "/todoList/static/mvp.css",
    "rel" : "stylesheet"
}
When we reload our todoList website it has started to look a bit nicer:
Step 3
Lets go ahead and add a footer onto the website, set the view definition on the pageFooter tag to be the following:
{
    "tag": "footer",
    "children": [
        {
            "tag" : "hr"
        },
        {
            "tag" : "small",
            "text" : [
                "© Copyright ",
                "$((new Date()).getYear() + 1900)",
                " Some Person"
            ]
        }
    ]
}
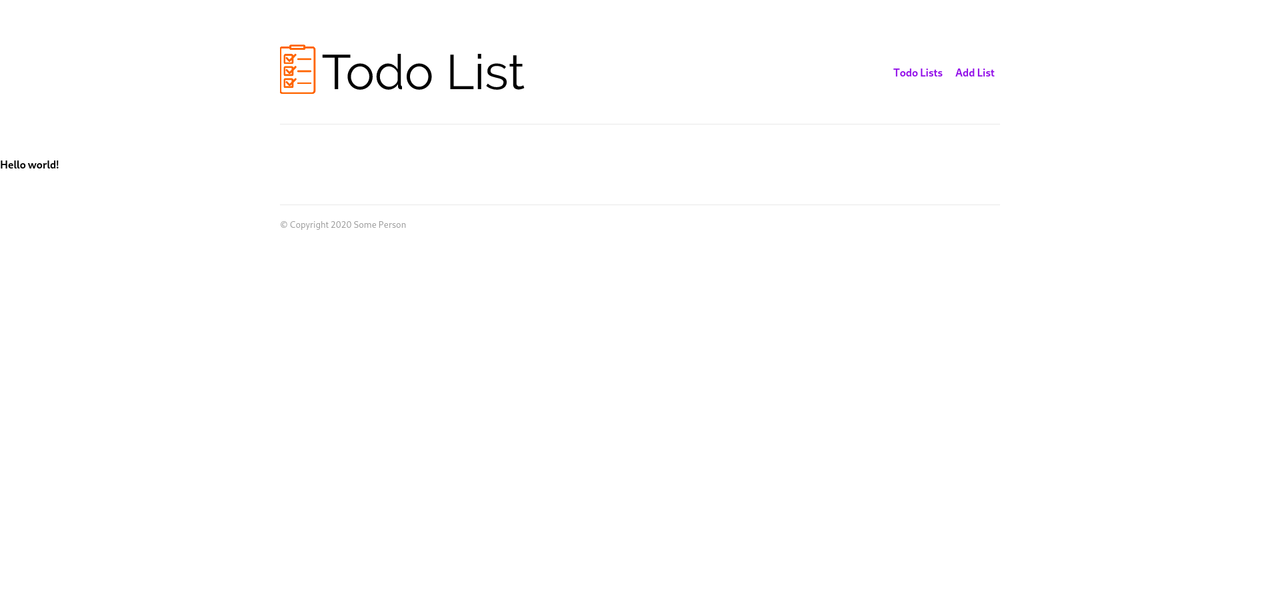
This includes a function value which displays the current year when the footer is rendered - $((new Date()).getYear() + 1900). Anything wrapped within $() will be executed and its result will be returned - any valid piece of javascript can be executed to return a value anywhere within a template.
Your website should look like this when loaded now:
Completed
We’ve added three new custom tags into our todoList website, along with two static files. We’ve used these tags to render output to the user, but nothing is interactive yet.
Storage
We are going to have to configure a new data type within the storage system to store the todo lists. We’ll add a datatype called todoList and define the schema for the objects that are to be stored within it. The Elemental Data system requires you to configure your data types using JSON schema and will provide a RESTful API over the top of this definition automatically.
Step 1
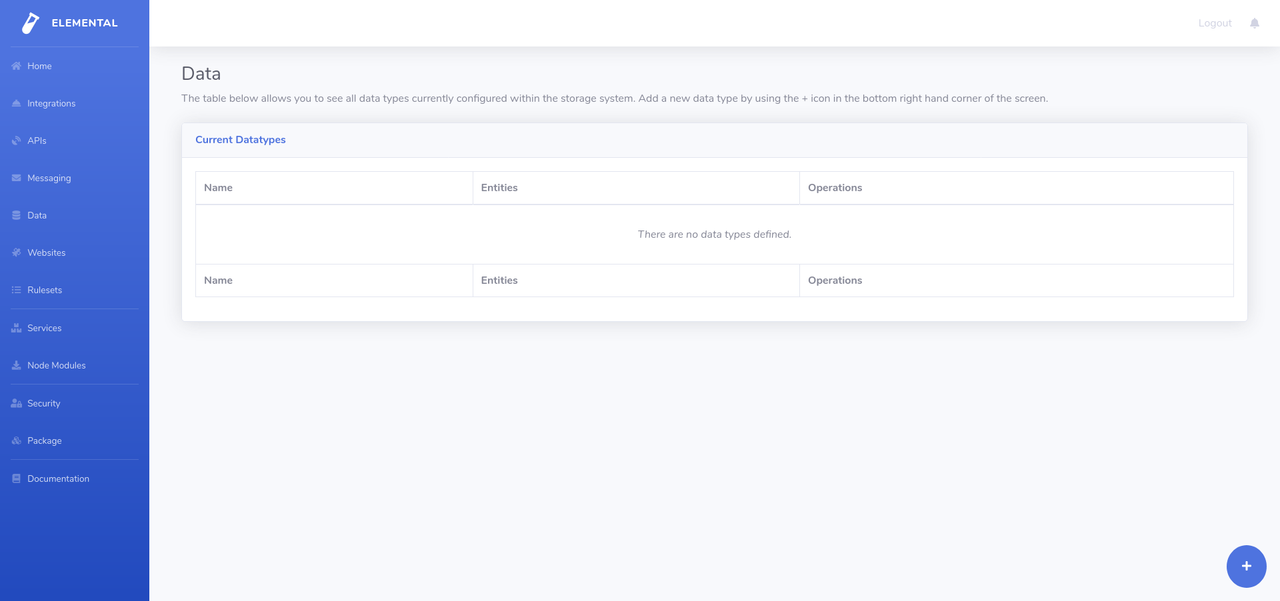
Navigate to the data section on the elemental admin and press on the big plus button in the bottom right to add a new data type.
Step 2
Update the default definition so that it matches this:
{
    "name": "todoList",
    "storageEngine" : "filesystem",
    "keys": [
        {
            "type":"unique",
            "paths":[
                "$.subject",
                "$.name"
            ]
        }
    ],
    "roles" : {
        "replace" : {
            "read" : true,
            "write" : true,
            "delete" : true
        },
        "read" : [],
        "write" : [],
        "delete" : [],
        "needsRole" : {
            "read" : false,
            "write" : false,
            "delete" : false
        }
    },
    "schema": {
        "type": "object",
        "properties": {
            "subject": {
                "type": "string"
            },
            "name" : {
                "type" : "string"
            },
            "entries" : {
                "type": "array",
                "items": {
                    "type": "object",
                    "properties": {
                        "title" : {
                            "type" : "string"
                        },
                        "description" : {
                            "type" : "string"
                        },
                        "completed" : {
                            "type" : "boolean"
                        }
                    }
                }
            }
        }
    }
}
This definition allows each todo list to have:
- An owner (subject)
- A name
- A list of entries, each with a title, description and a flag indicating if it has been completed
The definition also contains a unique constraint where we specify that each user can only have a unique set of todo lists based upon their name. We have defined our security so that we do not need a specific role claim on the identity making requests into the system, plus we have defined that this data type should use the filesystem storage engine.
Completed
We now have a data type that we can use to store our users data. We can now move onto the final step which is to create the website for this.
Adding some interactions
We’ve now got a website with a header and footer, plus a place to store our todo list entries for users.
We’ll need to add some functionality behind our websites / route in order to support the adding of todo lists into the system.
Step 1
Navigate back into the todoList website on the Elemental Administrative interface and click on the Modify Controller option next to the / route.
This will open up the controller editor which allows us to define data used for rendering our view and events that can be triggered by users:

Previously we added on a navigation menu at the top of the website which allows users to either view their todo lists or to add a new todo list - these options had events defined on them already within the view:
{
    "tag": "span",
    "onclick" : {
        "eventName" : "hideForm"
    },
    "text": "Todo Lists"
}
; and:
{
    "tag": "span",
    "text": "Add List",
    "onclick": {
        "eventName": "showForm"
    }
}
We’ll need to keep a boolean value around that determines if the form is visible or not, plus we’ll need to deal with the hideForm and showForm events. Add the following into the controller editor for the / route:
module.exports = {
    bag : {
        formVisible : false
    },
    events : {
        load : function(event) {
            if (typeof(this.bag.formVisible) === "undefined") {
                this.bag.formVisible = false;
            }
        },
        hideForm : function(event) {
            this.bag.formVisible = false;
        },
        showForm : function(event) {
            this.bag.formVisible = true;
        }
    }
};
If we reload the todoList website we’ll see that nothing much happens when these events are triggered at the moment, we have to update the / view so we toggle either show or hide a form based upon the $.bag.formVisible value.
Modify the view so we have the following definition within it:
{
    "tag": "wrapper",
    "children": [
        {
            "tag": "div",
            "class" : "list",
            "if" : [
                {
                    "statement" : "!$.bag.formVisible",
                    "logicalOperator" : "and"
                }
            ],
            "children" : [
                {
                    "tag" : "div",
                    "text" : "Lists here"
                }
            ]
        },
        {
            "tag": "div",
            "class" : "form",
            "if" : [
                {
                    "statement" : "$.bag.formVisible",
                    "logicalOperator" : "and"
                }
            ],
            "children" : [
                {
                    "tag" : "section",
                    "children" : [
                        {
                            "tag" : "strong",
                            "text" : "Form here"
                        }
                    ]
                }
            ]
        }
    ]
}
Now when we access the todoList website on http://interface.elementalsystem.org/todoList and click the two navigation options the interface should alternate between saying “Lists here” and “Form here” on the screen.
Step 2
Before we add the form that allows us to add new todo lists for a user, lets load the users todo lists and put them into the view.
Update the / routes controller so we add a new empty array called lists into the bag collection:
module.exports = {
    bag : {
        formVisible : false,
        lists : []
    }
};
Next we need to load the lists for the current user. We can use the built in storageService to make a request to our todoList data type within the load event:
module.exports = {
    events : {
        load : function(event) {
            if (typeof(this.bag.formVisible) === "undefined") {
                this.bag.formVisible = false;
            }

            return this.storageService.getList(
                "todoList",
                1,
                9999,
                {
                    "$.subject" : this.sessionState.getSubject()
                }
            ).then((result) => {
                this.bag.lists = result;
            }).catch((err) => {
                this.bag.error = err;
            });
        }
    }
};
The storageService provides a method called getList which can be called on an entity to fetch a list of results from that collection. As its fourth argument it takes in an array of filters that are applied to the entities within that data types store - in this case we are specifying the path (using JSON path notation) to the subject identifier stored within each entity and we are asking for it to match our current users subject identifier.
Note: The subject identifier is the unique identifier for the user and is issued by the Identity Provider (IdP) built into Elemental.
We need to remember to return the call to the getList method as it is asynchronous. Elemental knows to wait until an async method has completed before rendering the interface to the user - aslong as that async call is returned! If it is not returned then the interface may render before the call has completed.
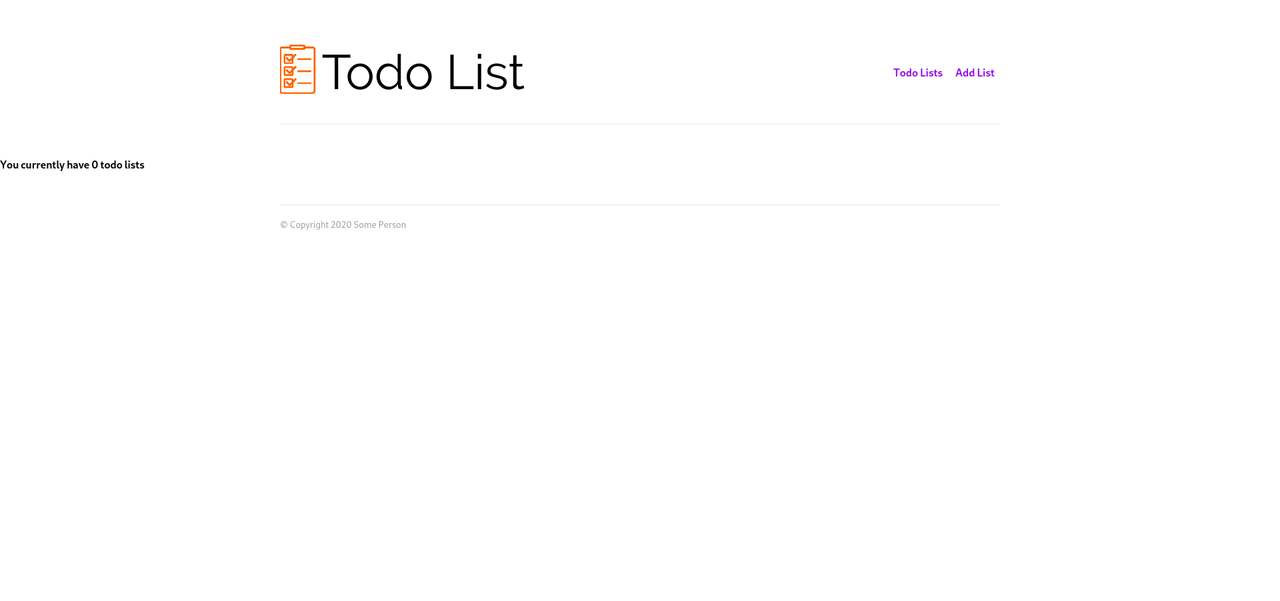
Lets update our interface so we can see a count of how many lists the user currently has. Modify the view on the / route so that we display the following element when the form is not visible:
{
    "tag" : "strong",
    "text" : "You currently have $.bag.lists.length todo lists"
}
When you reload the todoList website you should see something like:
Step 3
We need to add a form that allows uses to add a todo list. Elemental supports submit events on forms that can be handled within a routed controller. Add the following form definition into the / route view, within the block that displays when $.bag.formVisible is set to true:
{
    "tag": "form",
    "submit": {
        "eventName": "addTodoList"
    },
    "children": [
        {
            "tag": "h2",
            "text": "Add todo list"
        },
        {
            "tag": "p",
            "text": "To add a todo list please give the list a name:"
        },
        {
            "tag": "div",
            "children": [
                {
                    "tag": "label",
                    "text": "Name:",
                    "for": "todoListName"
                },
                {
                    "id": "todoListName",
                    "tag": "input",
                    "bind": "$.bag.name",
                    "required": "true"
                }
            ]
        },
        {
            "tag": "button",
            "type": "submit",
            "text": "Add"
        }
    ]
}
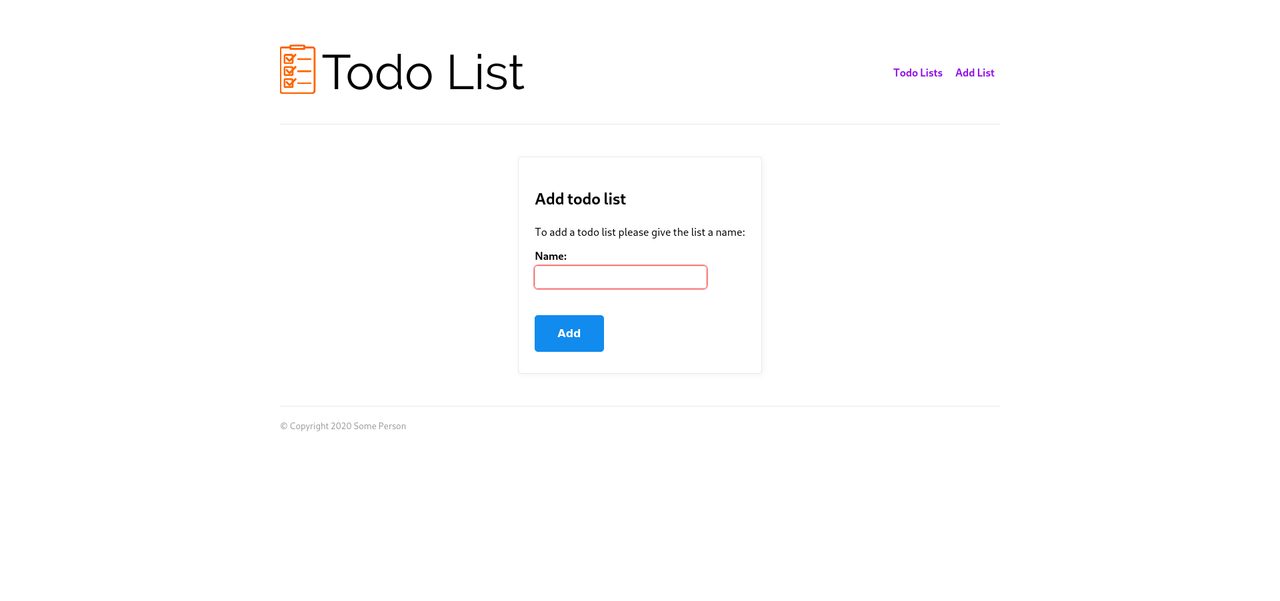
When you click the Add List option on your todoList website you should now be able to view the form you’ve created:
Unfortunately when you click the button it won’t add the new todo list yet, instead it will just take you back to the todo lists view. We need to add a new event into our / routes controller to support the adding of the new todo list. Add the following event to your controller:
module.exports = {
    events : {
        addTodoList : function(event) {
            return this.storageService.createEntity("todoList", {
                subject : this.sessionState.getSubject(),
                name : event.bag.name
            }).then(() => {
                this.bag.formVisible = false;
            });
        }
    }
};
We’ll also need to add a default value for the $.bag.name variable - add a new property called name to the bag collection and set it to an empty string.
When you use your form it should now add a new entry into the todoList data type collection, which should increase the count on the main screen of the app:

Step 4
To display the todo lists we should create a new custom tag called todoListItem. Add a new tag and give it the following configuration:
{
    "tag": "article",
    "children": [
        {
            "tag": "div",
            "children": [
                {
                    "tag": "div",
                    "style": "float: right;",
                    "text": "Delete",
                    "onclick": {
                        "eventName": "removeList",
                        "params": {
                            "id": "$.list.id"
                        }
                    }
                },
                {
                    "tag": "span",
                    "style": "font-size: 150%;",
                    "text": "$.list.name",
                    "onclick": {
                        "eventName": "openList",
                        "params": {
                            "id": "$.list.id"
                        }
                    }
                }
            ]
        },
        {
            "tag": "div",
            "if": [
                {
                    "statement": "'$.list.id' === '$.bag.openList'",
                    "logicalOperator": "and"
                }
            ],
            "children": [
                {
                    "tag": "ul",
                    "children": [
                        {
                            "tag": "listItem",
                            "repeat": "$.entry in $.bag.entries"
                        }
                    ]
                }
            ]
        },
        {
            "tag": "div",
            "if": [
                {
                    "statement": "'$.list.id' === '$.bag.openList'",
                    "logicalOperator": "and"
                }
            ],
            "children": [
                {
                    "tag": "form",
                    "submit": {
                        "eventName": "addListOption"
                    },
                    "children": [
                        {
                            "tag": "input",
                            "type": "hidden",
                            "bind": "$.bag.openList"
                        },
                        {
                            "tag": "label",
                            "text": "New entry:",
                            "for": "newEntry$.item.id"
                        },
                        {
                            "id": "newEntry$.item.id",
                            "tag": "input",
                            "bind": "$.bag.newListItem",
                            "autofocus": "true",
                            "required" : "true"
                        },
                        {
                            "tag": "button",
                            "type": "Submit",
                            "text": "Add"
                        }
                    ]
                }
            ]
        }
    ]
}
There are a number of new events within this interface - openList, removeList and addListOption, we will need to add these into the / routes controller.
Before we do that we need to create another custom tag called listItem which will be used for displaying the entries within each todo list. Add a new custom tag and enter the following configuration:
{
    "tag": "li",
    "children": [
        {
            "tag": "div",
            "style": "float: right; padding: 0px 0px 0px 15px;",
            "children": [
                {
                    "tag": "span",
                    "text": "Remove",
                    "onclick": {
                        "eventName": "removeListOption",
                        "params": {
                            "entry": "$.entry.id",
                            "id": "$.list.id"
                        }
                    }
                }
            ]
        },
        {
            "tag": "div",
            "style": "float: right;",
            "children": [
                {
                    "tag": "span",
                    "text": "Mark as completed",
                    "onclick": {
                        "eventName": "markAsCompleted",
                        "params": {
                            "entry": "$.entry.id",
                            "id": "$.list.id"
                        }
                    }
                }
            ],
            "if": [
                {
                    "statement": "$.entry.completed !== true",
                    "logicalOperator": "and"
                }
            ]
        },
        {
            "tag": "div",
            "style": "float: right;",
            "text": "Done!",
            "if": [
                {
                    "statement": "$.entry.completed",
                    "logicalOperator": "and"
                }
            ]
        },
        {
            "tag": "b",
            "text": "$.entry.title"
        }
    ]
}
This includes two new events - markAsCompleted and removeListOption - which means we have to add 5 new events into our controller. Before we do that we should add a reference into the new todoListItem custom tag within our / routes controller so we can see the output from these new tags. Add the following into your / route view, within the section that is visible when the form is hidden:
{
    "tag": "div",
    "repeat": "$.list in $.bag.lists",
    "children": [
        {
            "tag": "todoListItem",
            "list": "$.list"
        }
    ]
}
This element contains a repeat statement which will repeat itself for each item within the referenced list - $.list in $.bag.lists.
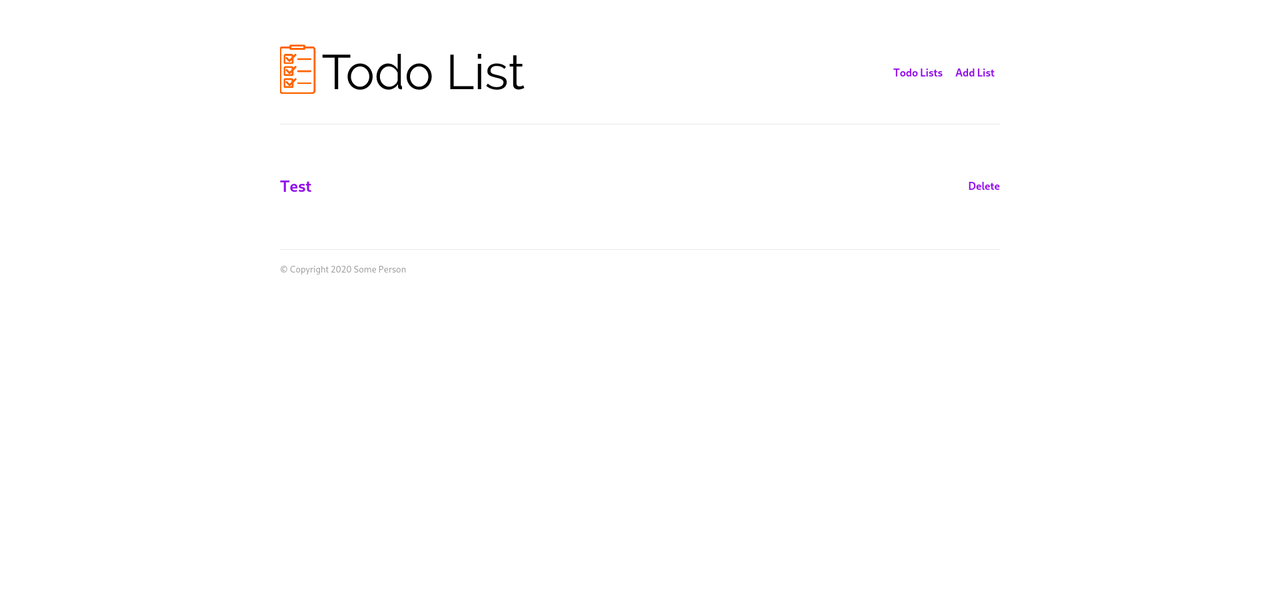
When we reload the main screen of the todoList website we can now see the name of the list we added before, plus the ability to delete it:
Right now none of the events are working as we need to add them into our controller.
Step 5
Finally, in order to make the application “complete” we will add the missing events into the / route controller.
Open up the controller and put our final controller logic into it:
module.exports = {
    bag : {
        formVisible : false,
        lists : [],
        entries : [],
        name : '',
        error : '',
        openList : '',
        newListItem : ''
    },
    events : {
        load : function(event) {
            if (typeof(this.bag.formVisible) === "undefined") {
                this.bag.formVisible = false;
            }

            this.bag.name = "";
            this.bag.newListItem = "";

            return this.storageService.getList(
                "todoList",
                1,
                9999,
                {
                    "$.subject" : this.sessionState.getSubject()
                }
            ).then((result) => {
                this.bag.lists = result;
            }).catch((err) => {
                this.bag.error = err;
            });
        },
        hideForm : function(event) {
            this.bag.formVisible = false;
        },
        showForm : function(event) {
            this.bag.formVisible = true;
        },
        addTodoList : function(event) {
            return this.storageService.createEntity("todoList", {
                subject : this.sessionState.getSubject(),
                name : event.bag.name
            }).then(() => {
                this.bag.formVisible = false;
            });
        },
        openList : function(event) {
            this.bag.openList = event.id;
            let sessionState = this.sessionState.retrieveSession() || {};
            sessionState.openList = this.bag.openList;
            this.sessionState.saveSession(sessionState);

            //load the entries for the list
            return this.storageService.getList(
                `todoList/${this.bag.openList}/entries`,
                1,
                9999
            ).then((result) => {
                this.bag.entries = result;
            }).catch((err) => {
                this.bag.error = err;
            });
        },
        removeList : function(event) {
            return this.storageService.deleteEntity(
                `todoList`,
                event.id
            ).then(() => {
                return this.storageService.getList(
                    "todoList",
                    1,
                    9999,
                    {
                        "$.subject" : this.sessionState.getSubject()
                    }
                );
            }).then((result) => {
                this.bag.lists = result;
            }).catch((err) => {
                this.bag.error = err;
            });
        },
        addListOption : function(event) {
            this.bag.openList = event.bag.openList;
            //post the new entry
            return this.storageService.createEntity(`todoList/${this.bag.openList}/entries`, {
                title : event.bag.newListItem,
                completed : false
            }).then(() => {
                //load the entries again
                return this.storageService.getList(
                    `todoList/${this.bag.openList}/entries`,
                    1,
                    9999
                );
            }).then((result) => {
                this.bag.entries = result;
            }).catch((err) => {
                this.bag.error = err;
            });
        },
        removeListOption : function(event) {
            this.bag.openList = event.id;
            //get the entry
            return this.storageService.deleteEntity(
                `todoList/${this.bag.openList}/entries`,
                event.entry
            ).then(() => {
                //load the entries again
                return this.storageService.getList(
                    `todoList/${this.bag.openList}/entries`,
                    1,
                    9999
                );
            }).then((result) => {
                this.bag.entries = result;
            }).catch((err) => {
                this.bag.error = err;
            });
        },
        markAsCompleted : function(event) {
            this.bag.openList = event.id;
            //get the entry
            return this.storageService.patchEntity(`todoList/${this.bag.openList}/entries`, event.entry, {
                completed : true
            }).then(() => {
                //load the entries again
                return this.storageService.getList(
                    `todoList/${this.bag.openList}/entries`,
                    1,
                    9999
                );
            }).then((result) => {
                this.bag.entries = result;
            }).catch((err) => {
                this.bag.error = err;
            });
        }
    }
};
When you now access your todoList website you should have a fully functional todo list application:
.
Taking it further
There are several bits missing from this application that stop it from being good enough, these are:
- Displaying errors to the user
- A message that displays when there are no lists defined
- Confirmation of removal of lists & list entries
- Ability to logout
- Ability for logged out users to view information about what the website does
Attempt to take the todoList website application further by adding a few of these missing features into it. The system documentation should contain all of the information you need in order to complete these features.